Archive | Salesforce RSS feed for this section

Sample Code: Custom Roll-Up Summary

14 Sep

As any Salesforce developer knows, if you want to create a field that “rolls up” a child records’ amount to its master object, you can simply create a Rollup Summary field.  But what if the relationship between the 2 objects isn’t a master-detail relationship, but a lookup relationship?  If it’s a lookup relationship, native Salesforce functionality won’t allow you to roll up any fields from one record to another.

This is a situation that will require custom code .

In my code sample, I have an Opportunity with a lookup field that allows the user to select a Portfolio record.  Each time the Opportunity amount changes, it should also trigger a change on its corresponding Portfolio record- to be more specific, it should trigger a change on the ‘Transaction Amount’ field on Portfolio.  The ‘Transaction Amount’ field calculates the total amount of all its associated Opportunity amounts.

The Portfolio page layout has an Opportunity related list that shows all the opportunities that look up to that one Portfolio.  We have to create a trigger for this because this is a ‘custom roll-up summary’ (‘rolling up’ to the Portfolio detail page) and as such requires a custom trigger, Apex class, and a test class.


/** TRIGGER Description: Custom roll-up summary of oppty amounts to Transaction_Amount__c on portfolio **/

trigger opportunityTrigger on Opportunity (before insert, before update, after insert, after update, after delete, after undelete) {


// other trigger logic here – note that it’s best practice to use a trigger template for each object

// sample trigger template 1 and sample trigger template 2


if (Trigger.isAfter && (Trigger.isInsert || Trigger.isUpdate || Trigger.isDelete || Trigger.isUndelete)) {


Set<Id> portfolioIds = new Set<Id>();


// add portfolio ids coming from new data

if (Trigger.new != null) {

for (Opportunity o : Trigger.new) {


// only add opps with valid portfolio id

if (o.Portfolio__c != null) {

portfolioIds.add(o.Portfolio__c);

}

}

}


// add portfolio ids coming from old data (deletes, moving an opp from one portfolio to another)

if (Trigger.old != null) {

for (Opportunity o : Trigger.old) {


// only add opps with valid portfolio id

if (o.Portfolio__c != null) {

portfolioIds.add(o.Portfolio__c);

}

}

}


if (portfolioIds.size() > 0) {

TransAmtRollUp.calculateTransAmt(portfolioIds);

}


}

}


/** APEX Class: TransAmtRollUp **/


public with sharing class TransAmtRollUp {


public static void calculateTransAmt (Set<Id> portfolioIds) {


// stores all portfolio Ids that have totals

Set<Id> IdsWithTotals = new Set<Id>();


// stores each portfolio id and its total opportunity amount

Map<Id,Double> oppTotals = new Map<Id,Double>();


AggregateResult[] groupedPortfolio = [ SELECT Portfolio__c, SUM(Amount) FROM Opportunity WHERE Portfolio__c IN :portfolioIds

GROUP BY Portfolio__c ];


for (AggregateResult ar : groupedPortfolio) {

IdsWithTotals.add((String)ar.get(‘Portfolio__c’)); // add each portfolio id with totals

opptotals.put((Id)ar.get(‘Portfolio__c’), (Double)ar.get(‘expr0’)); // add each portfolio id and its total amount

}


// put all portfolio with totals into a List of SObjects

List<Portfolio__c> portfolioToUpdate = [ SELECT Id, Name, Transaction_Amount__c FROM Portfolio__c WHERE Id IN :IdsWithTotals ];


// loop through the list and update the total for each Portfolio__c by looking up the total from oppTotals Map

for (Portfolio__c p : portfolioToUpdate) {

p.Transaction_Amount__c = oppTotals.get(p.id);

}


update portfolioToUpdate;


}

}


/** Write your own TEST CLASS: (OpportunityTriggerHandler_Test.cls) **/
Redirect Child Detail Page to Parent Detail Page After Saving

14 Sep

If you create and save a record on a related list, the expected Salesforce behavior is it will direct you to the detail page of the record you just created.

However, if you would like to redirect user to the parent detail page instead, you will have to do some URL hacking.

Firstly, you would need to create a new custom button.

Secondly, inside this new button, you may write the below code:

  • /a0P/e?CF00NQ00000019npV={!Opportunity.Name}&CF00NQ00000019npV_lkid={!Opportunity.Id}&retURL=%2F{!Opportunity.Id}&saveURL=%2F{!Opportunity.Id}
  • Note that you are adding a &retURL and &saveURL toward the end so that upon save, user is redirected to the parent detail page

Thirdly, replace the native button with this new button.

Install Ant Migration Tool on iOS

14 Sep
If you have a Mac and you’re trying to install the Ant Migration Tool, you may have been running around in circles because the Terminal will point you to the wrong root directory of Ant.  I figured out where the root directory of Ant was on my MacBook and was able to copy and paste the Salesforce Ant Jar into there.
  • If you type whereis ant on the Terminal, and your result shows/usr/bin/ant – it is pointing to the wrong location.
  • /usr/bin is actually pointing to some link and the actual location of Ant on my MacBook was /usr/share/ant/lib
  1. You can confirm by entering cd /usr/share then ls to see Ant there
  2. Enter cd ant/lib
  3. Enter pwd
  4. Highlight and copy full path displayed
  5. Open Finder
  6. Select ‘Go’ > ‘Go To Folder’
  7. Paste full path /usr/share/ant/lib
  8. Copy and paste Salesforce Ant Jar here

Spring ’13 Release Notes

19 May

Below are my notes for the Spring ’13 Release, for both ADM201 and DEV401.  Please refer to the Spring ’13 Release documentation for more information and detail.

Chatter Enhancements

  1. You can now post to any public Chatter group; no membership required.
  2. You can search in public and private groups in which you belong, using the feed search on top of group pages.  To search, click on the magnifying glass icon; you can search by hashtag (#), file names, @ notations, or a phrase.  You can also use a wildcard *, operators, or quotation marks to narrow down to expand your search.
  3. For organizations with more than 26 people, your ‘Recently Viewed People’ list will now display by default when you click on the ‘People’ Chatter tab on the left column.  For organizations with 25 or fewer people, your default view will be ‘All People’ when you click on the ‘People’ Chatter tab.  Please note, all Salesforce user licenses are used to calculate the total number of users.
  4. The ‘Search Chatter Feeds’ link on Global Search results page is now labeled ‘Search Feeds.
  5. Users can reply to Chatter email notifications with the word “like” to like a post in Chatter.
  6. When Chatter Messenger is minimized, it now takes up less on-screen space than before, and user chat statuses are no longer archived in the chat history.
  7. Linked previews have been expanded to include 12 additional websites.
  8. Finally, Connect in Apex is available through Developer Preview.

Chatter Tasks

  1. Tasks are still located in the ‘Activities’ related list of a record, but now they are also located in the Chatter feed of the record in which they were created.  You can now create tasks right on the record feed.  The ability to view tasks for a Chatter record is automatically enabled, and you can turn this feature off in the Chatter settings in the Setup menu.

Sales Cloud – Forecast Enhancements

  1. You can now forecast and view quotas by quarter, and you can adjust these settings in the Forecast Settings.  Important: All forecast adjustments and quotas are lost if the period setting is changed from monthly to quarterly, or vice versa.
  2. If your organization uses Partner Portal, you can now include Partner opportunities in the Forecast (please note Partners do not have access to the Forecasts tab).  To include Partner opportunities in the forecast, the administrator needs to enable the Partner Portal user in the Forecast Hierarchy and ensure the person is assigned to the active Forecast Manager.  The Forecast Manager must also be the owner of the Partner account.  In addition, the Partner user needs the ‘Allow Forecasting’ checkbox enabled on the user record.
  3. Ability to adjust the width of the Forecast columns.
  4. When running Forecast reports, user can filter Forecast reports to view ‘My’ or ‘All’ records

Sales Cloud – Salesforce.com For Outlook Enhancements

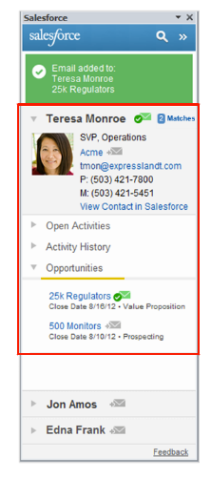
  1. The Salesforce Side Panel (beta) is now generally available in all languages supported by Salesforce.  When a user selects an email in Outlook, the side panel displays the details of up to 4 matching Leads or Contacts from Salesforce in the order they appear in the to, from, or cc field, along with related Opportunities and Activities.  If multiple matches are found, users can click on the ‘2 Matches’ link to view them and select the one to display.  Users can select the email and add to any one of the displayed Leads, Contacts, Accounts, or Opportunities in Salesforce, or, they can search for other records to add the email to.  The administrator can enable the Side Panel through the Setup | Data Administration | Outlook Configurations.  For security purposes, use of the Side Panel requires that your organization’s Salesforce URL be registered as a remote site.  Administrators can register the site in Setup.
  2. Improved sync performance – Contacts now sync automatically every hour, rather than every 10 minutes.
  3. Improved security – users are prompted to log in when not logged in through their browser.

Image

Sales Cloud – State and Country Picklists (Beta)

  1. Users can now choose a state and country from picklists rather than typing them into text fields.  Most standard objects support the beta release of these picklists.  Why is this important?  Before this feature, reporting on Leads by country was difficult because users are not consistent when entering data in the Country field.  This will improve the accuracy of state and country data in your Salesforce organization, adding efficiency to his searches and reports.  To use this feature, you must first contact Salesforce to enable the beta feature of State and Country Picklists in your organization.  Once this beta feature is enabled, the process to implement State and Country Picklists involves advanced setup steps using the Metadata API.  You must carefully plan this feature implementation because it will affect any customizations that use state and country information in your org, like reports, email templates, and list views.  Since you cannot change personal customizations like these, you will need to plan appropriate messaging to set expectations for your end users.

Sales Cloud – Salesforce Touch

  1. With the new Winter ’13 release, all standard and custom apps can be accessed via Salesforce Touch, no longer just the Sales app.  Additional objects are also supported, including: Cases, Leads, and Person accounts.  Dashboard and Visualforce tabs are also now supported.  Programmatic customizations to the Salesforce interface (including Visualforce components) are not supported in Salesforce Touch.  The only supported customizations are Visualforce tabs.  In addition, Chatter is no longer required to use Salesforce Touch.

Data.com

  1. There are now over 200 million accounts available from over 200 countries around the world.  This new release brings the ability to search by city.  In addition, users can differentiate between records they have in Salesforce and records they purchased from Data.com, right within their search results.  Records that are exported are easily accessible from the Files tab, and stored securely for future use.

Data.com – Corporate & Premium Enhancements

  1. The additional countries are only available for account data; contacts are limited to the original 10 supported countries.
  2. Searching by city will return any city sharing that name within the country.  For example, New York will return New York and New York City.  To specify an exact match, enclose the search term with quotes.
  3. If the Files tab is disabled, the export file will be emailed to the user exporting the data.
  4. There are a few different scenarios you might see while using the new check mark in search.  For example, if the record is imported from Data.com and then deleted from Salesforce, there will be a check mark.  In this scenario, if a user needs the record in Salesforce after it’s been deleted, it can be added again w/o an additional charge to the addition limit for the month.

Data.com Clean

  1. Inactive records can now be compared to Data.com for possible updates, and for customers using Data.com Clean, matching accounts with the D&B DUNSRight process is available in a controlled rollout.
  2. DUNSRight Matching – Is used for better international account data management.  The configurable matching threshold allows admins to control match rates.  Lowering the threshold results in more matches, and increasing the threshold means better quality matches.
  3. To activate this controlled rollout feature, reach out to your Data.com representative.  DUNSRight Matching is part of an off-cycle release and will become available the weekend of February 8th.

Winter ’13 Release Notes

2 Feb

I just completed the ADM201 and DEV401 Winter ’13 Release maintenance exams.  Below are some release notes I’ve gathered.  As always, please refer to the Winter ’13 Release documentation and the learning videos for more detail and information.

Force.com

  1. Permission Sets – Previously, permission sets can only be assigned to users with the same user license type.  With this new release, however, permission sets no longer need an associated license type and can be assigned to users with different license types.
  2. Visual Workflow – When navigating visual workflow screens, end users can usually choose between navigating to the ‘Previous’ screen or to ‘Finish’ execution of the flow.  Now, with Winter ’13, you can change this default navigation behavior, namely, you can choose to remove the ‘Previous’ and ‘Finish’ navigation links.  In addition, you can now add a checkbox, multi-select checkbox, and multi-select picklist fields to the visual workflow.  There are also other various new UI enhancements such as an enhanced search palette that lets you highlight search results in your flow, a new ‘Zoom’ function, and a new ‘Get Started’ link on the upper right-hand corner which is a video introduction to Visual Workflow.
  3. Developer Console – There will be a new ‘Tests’ tab and ‘Query’ tab in the Developer Console.  The ‘Tests’ tab lets you run unit tests, look at code coverage percentages, and also tells you which portions of your code is not covered in a unit test.  The ‘Query’ tab lets you write and view your SOQL queries without switching screens.  Also, you can now create multiple perspectives (a perspective is a layout of panels) in the System Log view.
  4. Apex Test Framework – With this release, you can now create a CSV (comma-separated) file, store it as a static resource, and then use this static resource in the Test.loadData() method to create your test data.  Also, to simulate SOAP and Rest-based callouts in your test methods, Apex now includes the new Test.setMock() method along with a few other helper classes, interfaces, and static resources to create simulated Web services responses.

Analytics

  1.  With this new release, you can now print and export joined reports using the ‘Printable View’ button (up to 2000 rows of data), you can also now display a joined report chart on a dashboard, and also – my favorite – you can now create Scatter Charts!

Data.com

  1. New ability to filter search results using custom employee count and revenue ranges.  In addition, users can filter a company’s location on contact and company searches, and select records across multiple search search result pages.
  2. Up to 1,000 records can be selected at a time across multiple pages to add or export from Data.com. Also remember that every user has a default monthly addition limit of 300 records per month.
  3. Data.com now respects ‘Do-Not-Contact Preferences’ by hiding email address and phone number from records that appear in Data.com search results.
  4. Data.com now also allows duplicate records to be created in case the user wants to use duplicate records for different marketing campaign efforts.  You can specify this preference under ‘Duplicate Preferences’.
  5. Error logs are now available in the ‘Files’ tab for when records are not successfully added to Salesforce from Data.com
  6. Field-level options for objects allow administrators to pick which fields Data.com Clean fills blank values on, custom field mapping allows administrators to pick which Data.com fields correspond to which Salesforce fields, and individual records can be locked to prevent Data.com Clean from providing updates on them.  So if a deal is on the table at a sales rep’s account, that rep can lock the record from any updates until the deal is closed.

Chatter

  1. Currently, you can post Text, a File, or Link in Chatter.  With this new release, you can now post Polls, with more than 3 and up to 10 poll options.
  2. Other Chatter UI enhancements include a consolidated Chatter Tab Navigation, rich link previews, post to groups publisher without navigating to the group’s profile, and a visibility widget which shows you the visibility of your Chatter posts.

Sales Cloud

  1.  New Forecast Items custom report types and Forecast Quotas custom report type.  
  2. Configurable Opportunity List View for ‘Forecasts’ tab.  Administrators can add up to 15 fields to the ‘Opportunities’ pane on the ‘Forecasts’ tab.
  3. A new Forecast API that developers can use for integration purposes
  4. Sales Managers can hover over a Sales Rep’s name to easily connect with them via e-mail, phone, or Chatter
  5. Sales Managers can adjust forecast in any currency without changing the currency in the display settings
  6. Customizable Opportunity Teams.  Sales Teams have been renamed to  a new object called ‘Opportunity Teams’.  In addition, please note workflow rules are not available for Opportunity Teams.  The Opportunity Team Member object cannot be thet parent object in a relationship.  The Opportunity Team Member object cannot be the primary object or have child objects in the custom report type.  Validation rules and triggers are not supported when adding default teams.  Also note to in order to use opportunity sales team, the Administrator will need to enable ‘Team Selling’ in ‘Opportunity Teams’ > ‘Settings’.

Service Cloud

  1. Case Feed Enhancements.  The Case Feed page is an optional replacement for the Case Detail page and is designed for support agents in fast-paced environments who interact with customers via multiple channels.
  2. Ability to write custom publishers using Visualforce pages.
  3. Customizations to the Email Publisher.  Administrators can customize email publisher items, such as header fields, email tools, and buttons.  Administrators can also enable email drafts, configure approval processes for email drafts, and assign permission to bypass an email approval process.  Lastly, the Administrator can also customize the UI in a number of ways as well as the security permissions of the Case Feed.
  4. Chatter Answers Enhancements.  Community members have a new ‘Reputation’ icon for how much they contribute to Chatter Answers.  Users can also format text and add photos to questions.  Administrators can create custom page layouts using Visualforce, add buttons and links, and brand emails with custom HTML and CSS.
  5. Ideas Community Enhancements.  Idea Themes is a new feature and are new objects that allow you to solicit feedback from your community members around planned projects.  Users can collaborate around a topic using Ideas, comments, and votes. This is so you can select the best solution.  Another new feature is you can now integrate and manage Ideas and Themes within the Service Cloud console and list views.  And lastly, there is a new User Interface Library (an AppExchange product) that allow you to customize the look, feel, and functionality of your Ideas community site.  (Important Note: Once you enable the Community Theme feature, you cannot disable it.)
  6. Salesforce Knowledge Enhancements.  Data categories can now be assigned with permission sets and profiles.  This allows the administer to assign visibility to for example, a ‘Customer Portal User’.  You can also pre-populate article search filters based on the values of case fields (case fields must be a text or picklist field).  To accomplish this, we would have to use the ‘Case to Data Category Mapping (beta)’ which is a beta version of the Winter ’13 release.  Other enhancements include ability for email templates to support article type fields, case feed allows support agents to share an article link, and an article type field can be added to custom report types.
  7. Service Cloud Console Enhancements.  Winter ’13 introduces ability to customize hot keys (aka keyboard shortcuts), a new personalization framework, adding and removing Push Notification listeners, and integration of 3rd-party data and applications.

How To Generate Custom Fields En Mass

28 Jan

A colleague of mine was recently tasked with creating a brand-new application on Salesforce.com for our client.  Since she was completely new to Salesforce, she had a few questions about formula fields, workflow rules, etc. that I had to help her with.  One of her tasks was to generate hundreds of custom fields, but she did not want to do it by hand through the user interface because let’s face it, it would take an eon just going through all the steps.  After helping her research the best way to mass generate hundreds of custom fields, I present the steps here for you:

  • Step 1. Download and install Eclipse Force.com IDE here.  I recommend downloading the Eclipse Plug-In (not the Standalone App) because my Salesforce instructor had mentioned there are a lot of bugs in the Standalone App.
  • Step 2. Get a editable copy of the ‘Field Utilities For Salesforce Developers’ Excel macro sheet here.  This spreadsheet is currently read-only.  To get an editable copy, sign in as a Google user (click ‘Sign-In’ on the upper-right hand corner), click on ‘File’, and then ‘Make a Copy’.
  • Step 3. On the bottom of your editable copy of ‘Field Utilities For Salesforce Developers’ Excel sheet, click on ‘Generate Field XML’ tab.
  • Step 4. On this page, you will see all the XML metadata for each type of custom field.  Type in whatever info (e.g., full name, label, data type, default value) you have about your custom field, then copy and paste the entire XML tag into the appropriate object in Eclipse.
  • Step 5. Click ‘Save’ on Eclipse and viola!  Your new custom fields are now created and can now be seen on the Salesforce.com UI.

How to Parse a Long Text Area

25 Jan

Have you ever wanted to parse a Long Text Area to look for a certain word without writing custom code, only to find your colleagues telling you it’s not possible, because Salesforce.com doesn’t fully support Long Text Areas?  This was the exact dilemma I faced on my last project.  I walked into work one day, telling my manager I need to implement logic where if the standard field ‘Description’ (a Long Text Area), contains any where the word ‘urgent’, then flag the case as an ‘urgent’ case.  This way, the internal users of the application will be able to see which cases are urgent.  As a side note, the client did not want an ‘Urgent’ checkbox field on the Case because everyone will be checking that box if it were on the form, they claimed.

Is this good design?

My personal thought is, no, it is not the best design.  Because what if the user enters ‘not urgent’ in the ‘Description’ field?  This would flag the case as ‘urgent’ when it is not.

My first attempt at implementing this logic in Salesforce got me trying to use the CONTAINS function in a custom field-formula.  But every time I tried saving the formula, I would get the below error:

Error: You referenced an unsupported field type called "Long Text Area" using the following field: Description

After researching the error on Google, it appeared that Long Text Areas are not fully supported in the custom field-formula type.  So I researched some more, and found a workaround solution.  I found out there are different functions available for different types of formulas in Salesforce.

For the custom field-formula type, the CONTAINS function will not parse a Long Text Area and will generate the above error. However, in the rule criteria for a Workflow Rule, there is a different set of functions available for you to use.  Among them is the REGEX function, which is available for use in a Rule Criteria but not available for use in a custom field-formula type.  They also have the CONTAINS function and after tickering around a bit…I found out the CONTAINS function in the Workflow Rule Criteria will actually parse a Long Text Area.

And so, to implement the requirement where I need to parse a Long Text Area for a certain word without custom code, I was able to use a Workflow Rule Formula to accomplish this:

NOT(ISBLANK( Description ))
&& CONTAINS( LOWER(Description), "urgent")
&& NOT(CONTAINS( LOWER(Description), "not urgent"))

As you can see, this formula also covers the scenario if the user enters ‘not urgent’ in the ‘Description’ field, the formula will not flag the case as an ‘urgent’ case.  If the case is an ‘urgent’ case, then the workflow will update a hidden custom checkbox field, indicating the case is urgent.  I then wrote a custom formula for the ‘Urgent’ field to display a red flag icon on the case, if this hidden checkbox is checked.

Filter Report Criteria by URL

6 Jul

Did You Know?  You can automatically modify filter criteria for a report via the URL parameter.

For example, if you want to show only results with a parameter of “green” Risk Color, then you would amend the URL parameter to:

 https://cs11.salesforce.com/xxxxxxxxxxxxx?pv1=”green” 

This will give you a report with all the results that have a “green” risk color.